Double Fold Gate Card, Guest Author on Splitcoaststampers
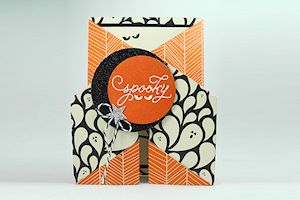
I'm excited to announce, I'm the Guest Tutorial Author on Splitcoaststampers today! I'm sharing a Double Fold Gate Card tutorial for Splitcoaststampers. Woohoo!

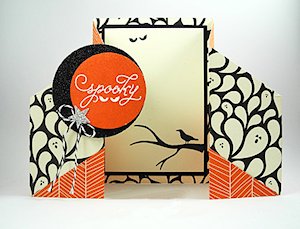
 I had fun decorating this card by extending the stamping to the
inside of the card. So when it's opened, it would like like a spooky
moon scene. The new Among The Branches stamp set worked perfectly to achieve the look I was going for.
NOTE: if you like to Bundle & Save (15% off), then you'll want to check out the Among The Branches Photopolymer Bundle [140872] (bundled with the Woodland Texture Impressions Embossing Folder (a must-have!).
Be sure to check out my How'd She DO That? video for a demonstration of the diagonal cuts, what to do with the the leftover from those cuts, how to do the folding and two more card ideas for you!
Here is the how-to video...
The video comes from https://www.youtube.com/watch?v=Lc15b97wyQA
This card was created by Dawn O
Here's is another card by Dawn O, using the same technique

The Autumn color palette is Old Olive, Tangelo Twist and Soft Suede. The sponging really makes the the leaves pop, as well as softens their tone. Plus, I bring the outside to the inside panel with a little stamping too.

This type of Fun Fold card works best with double sided paper, perfect for Stampin' Up!'s Designer Series Paper. I chose a fun new Halloween paper from the 2015 Holiday Catalog, called Happy Haunting
Double Fold Gate Card Measurements
- 12" x 5-1/2" piece of Happy Haunting Designer Series Paper
- Score at 2", 4", 8", & 10"
- Turn and pencil mark 2-3/4" on top and bottom
- Diagonal cut from top of 4" score to side 2-3/4" mark, and from top of 8" score to other side 2-3/4" mark (save these pieces to decorate the card)
- 3-1/4" x 4-3/4" piece of Very Vanilla cardstock
- 3-1/2" x 5" piece of Basic Black cardstock
- Be sure to watch the How'd She DO That? video for a demonstration
NOTE: if you like to Bundle & Save (15% off), then you'll want to check out the Among The Branches Photopolymer Bundle [140872] (bundled with the Woodland Texture Impressions Embossing Folder (a must-have!).
Be sure to check out my How'd She DO That? video for a demonstration of the diagonal cuts, what to do with the the leftover from those cuts, how to do the folding and two more card ideas for you!
Here is the how-to video...
The video comes from https://www.youtube.com/watch?v=Lc15b97wyQA
This card was created by Dawn O
Here's is another card by Dawn O, using the same technique
The Autumn color palette is Old Olive, Tangelo Twist and Soft Suede. The sponging really makes the the leaves pop, as well as softens their tone. Plus, I bring the outside to the inside panel with a little stamping too.
Dawn O's Blog
Dawn's instructions from the Splitcoast Stampers site follow...
Double Gate Fold Card
by Dawn Olchefske
Score, cut and fold to create this card that opens in the center.
Supplies
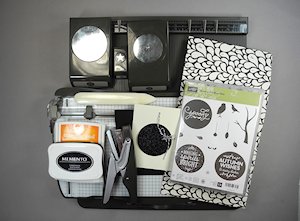
- Double-sided patterned paper cut to 12" x 5-1/2"
- Scoring board
- Paper trimmer
- Bone folder
- Adhesive
- Pencil
- Other supplies as needed to complete the card (Stampin' Up!® Supplies used here: Among The Branches stamp set, Tuxedo Black Memento Ink Pad, Vanilla card stock (3-1/4" x 4-3/4"), Black card stock (3-1/2" x 5"), Tangelo Twist Classic Stampin' Pad Paper, Happy Haunting Designer Series Paper (12" x 5-1/2"), Black and Silver Glimmer Paper, 2" and 2 1/2" Circle Punch, Itty Bitty Accents Punch Pack (star), Handheld Stapler and staples )
Step-by-Step
-
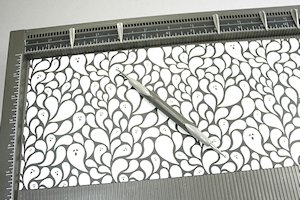
Step 1
Place 12" x 5-1/2" piece of patterned paper onto the scoring board. Score at 2", 4", 8" and 10".
-
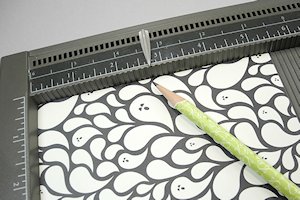
Step 2
Rotate the paper 90 degrees. With a pencil, mark at 2-3/4" on each short end.
NOTE:
You may need to mark the top of the 4" and 8" score lines so you can see them better for the next step.
-
Step 3
With a paper trimmer, make a diagonal cut from the top of the 4" score line to the side 2-3/4" mark. Repeat from the top of the 8" score line to the 2-3/4" mark on the other side. Erase pencil marks.
NOTE:
Save triangle cut-outs for step 5.
-
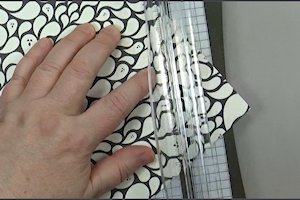
Step 4
Fold inward on the 4" score line, then fold back outward on the 2" score.
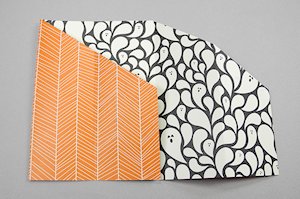
-
Repeat on the other side.
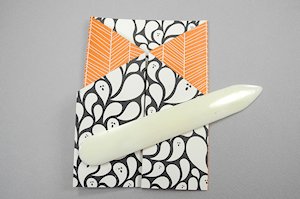
-
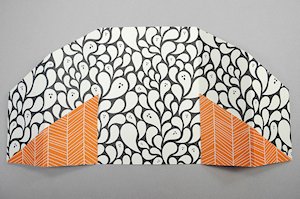
Step 5
Reopen card and place cut-outs from step 2 back into place (like a puzzle).
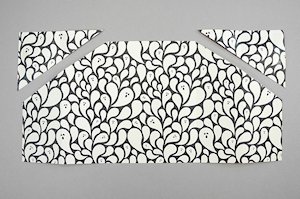
-
Flip cut outs over and move to opposite lower corner of the card.
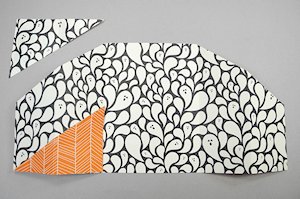
-
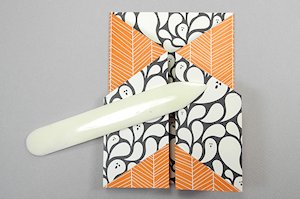
Step 6
Adhere the triangles in place and refold.
-
TIP:
Adhere the larger end of the triangle first. Fold the card in, and then glue down the tip.
-
Step 7
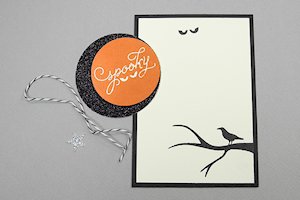
Decorate the card as desired.
-
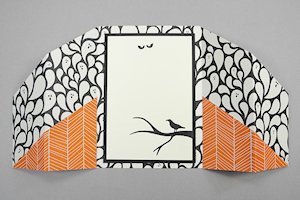
The inside panel of the card is 3 1/4" x 4 3/4" (vanilla), layered on a 3-1/2" x 5" black panel.
-
Step 8
Finished card size is 4" x 5 1/2".
-
It will fit in an A2 envelope.

No comments:
Post a Comment