Today I'm sharing my One Sheet Wonder Class - Featuring Bloomin' Love by Stampin' Up! This One Sheet Wonder Class is the 6th in my series and in this video we'll be making seven cards and a box out of one piece of the Birthday Bouquet Designer Series Paper. We're using the Bloomin' Love Stamp Set featured on page 17 of the Occasions Catalog. Here's a video on our One Sheet Wonder Class .....CLICK HEREto watch the video on my Chic n Scratch website.
Click on the link below to download the Tutorial that includes the template for cutting your Designer Series Paper ... as well as the supply list.
I had a tough time again this week deciding on which stamp set to
use, but a new set won out of course, the Stampin Up First Sight set on
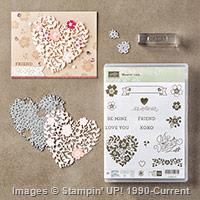
page 36 of the Occasions Catalog. I combined with the beautiful Bloomin
Heart Thinlits for my art piece (page 16 and there is also a lovely
stamp set that goes with that as well – check out the bundle and save
15%).
Sandi’s Tips & Tricks:
I started by White Embossing that lovely flourish onto Shimmery White card stock.
Which means I used the “resist technique”, by sponging on Melon Mambo and Strawberry Slush ink to get the embossing to pop out!
To frame out my background I used black and then white card stock
and the sentiment strip across the center matches my Bermuda Bay card
base.
For the art piece; I used piece of Whisper White and die cut the
heart thinlit, then I cut a circle out of it with the 5th from center
circle framelit.
This is matted to a piece of Strawberry Slush cut the same size and
then matted to a piece of Whisper White punched out with the 2-1/2″
circle punch….
Phew, are you tired yet! haha….it seems like a lot, but it was fun and went quite quickly.
So, I also sponged a scrap of the shimmer white so I could stamp and
cut out the two flowers, these were from the Stampin Up Bloomin Love
Stamp Set….and they coordinate perfectly with the flowers cut out by the
die…
The art piece is attached with Dimensionals and then embellished with a few Rhinestones.
Card Base: Bermuda Bay 4-1/4 x 11, Whisper White 4 x 5-1/4, Basic Black 3-7/8 x 5-1/8.
Background: Shimmery White 3-3/4 x 4
Sentiment Strip: Bermuda Bay 1-1/4 x 5
Circle Art Piece: Whisper White 4 x 4, Watermelon Wonder 3 x 3, Whisper White 3 x 3
Supplies used to create the Stampin Up First Sight card:
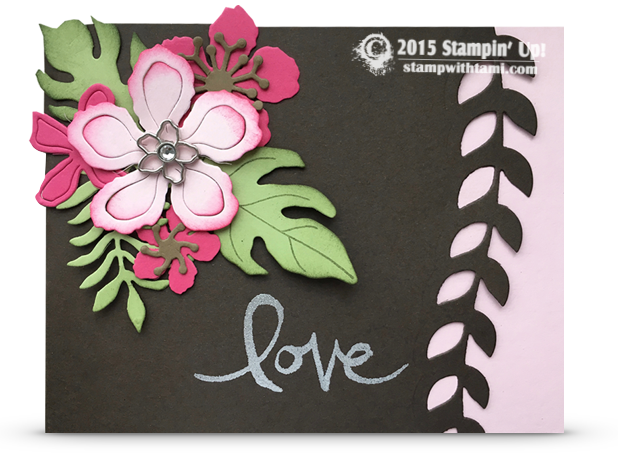
Today's video is an "outside the box" Stampin Up Valentine's Day card
idea. It can easily be converted for any occasion simply be changing the
"Love" greeting. I'll show you how to cut all of these flowers and
leaves with 1 spin on the big shot, and how to make this super cool
leave edging.
The words are heat embossed. They are from the Watercolor Words stamp set.
Save 15% when you purchase the Botanical Blooms stamp set and framelits together as a bundle.
Today’s video is an “outside the box” Stampin Up Valentine’s Day card
idea. It can easily be converted for any occasion simply be changing
the “Love” greeting. I’ll show you how to cut all of these flowers and
leaves with 1 spin on the big shot, and how to make this super cool
leave edging.
The words are heat embossed. They are from the Watercolor Words stamp set. Save 15% when you purchase the Botanical Blooms stamp set and framelits together as a bundle.
Cute Conversations is the name of the January 2016 Paper Pumpkin kit
from Stampin Up. The stamp set that came in the kit reminded me of the
candy "conversation" hearts, and that's what I used for inspiration for
these alternate card ideas. They are kind of like big giant candy heart
cards. There's a little something for everyone in this kit. So you can
spread the love, whether you have a Valentine, or not.
Some of
the techniques I'm going to share in today's video are how to make this
cool gold splatter effect, heat embossing, how to use the emboss buddy,
background texture and sponging.
Being single, I got a huge kick
out the "Meh" stamp, and had some fun making a little different "broken
hearted" version of the card hahaha!
Periscope: My unboxing
reveal clip was filmed live on Periscope. I broadcasted the box opening
as soon as the kit arrived in my mailbox, it was so excited. I love
doing the live video because you guys can be a part of it and ask
questions while we go. It's more then just me talking to myself lol. As
we were "scoping", on of the gals had to run out to her mailbox she was
so excited. Join me on Periscope @stampwithtami
Hi Stampers : Here are the supplies I will be using in todays video : Tart & Tangy stamp set #111514 Stem Sayings Stamp set # 115078 Vellum card stock # 101856 Rich Razzleberry card stock #115316 cut at 1 1/4 X 5 1/2 " Razzleberry lamonade designer paper # 105675 cut at 1 1/2 X 5 1/2" 2nd piece cut at 3" X 4 1/4" So Saffron card stock #105118 cut at 4 1/4" X 11" scored at 5 1/2 " Scallop trim border punch #118402 (Free in Sale-a-bration mini ) YoYo Yellow classic ink # 102717 Sponge dauber #102892 Sticky strip #104294 Straw and a 8ox cup & pencil ( local store ) Mini glue dots #103683 2 way glue pen # 100425 Dazzling Diamonds # 102023 1 1/4" Circle punch #104403 3/4" square punch ( retired ) But you can use any size sq punch . Whisper white card stock # 100730 ( to make cup template )
- See more at:
http://dawnsstampingthoughts.typepad.com/dawns_stampin_studio/2010/03/lemonade-cup-card-video-.html#sthash.jj1vxjpk.dpuf
Lemonade Cup Card Video ...
What can I say Hi Stampers :
Here are the supplies I will be using in todays video :
Tart & Tangy stamp set #111514
Stem Sayings Stamp set # 115078
Vellum card stock # 101856
Rich Razzleberry card stock #115316
cut at 1 1/4 X 5 1/2 "
Razzleberry lamonade designer paper # 105675
cut at 1 1/2 X 5 1/2"
2nd piece cut at 3" X 4 1/4"
So Saffron card stock #105118
cut at 4 1/4" X 11" scored at 5 1/2 "
Scallop trim border punch #118402 (Free in Sale-a-bration mini )
YoYo Yellow classic ink # 102717
Sponge dauber #102892
Sticky strip #104294
Straw and a 8ox cup & pencil ( local store )
Mini glue dots #103683
2 way glue pen # 100425
Dazzling Diamonds # 102023
1 1/4" Circle punch #104403
3/4" square punch ( retired )
But you can use any size sq punch .
Whisper white card stock # 100730 ( to make cup template )
Don’t
you just love when you find two things in your craft room that don’t
officially go together, but they just work together perfectly?? I was
so blown away when I was given a card by fellow demonstrator Jen Martin
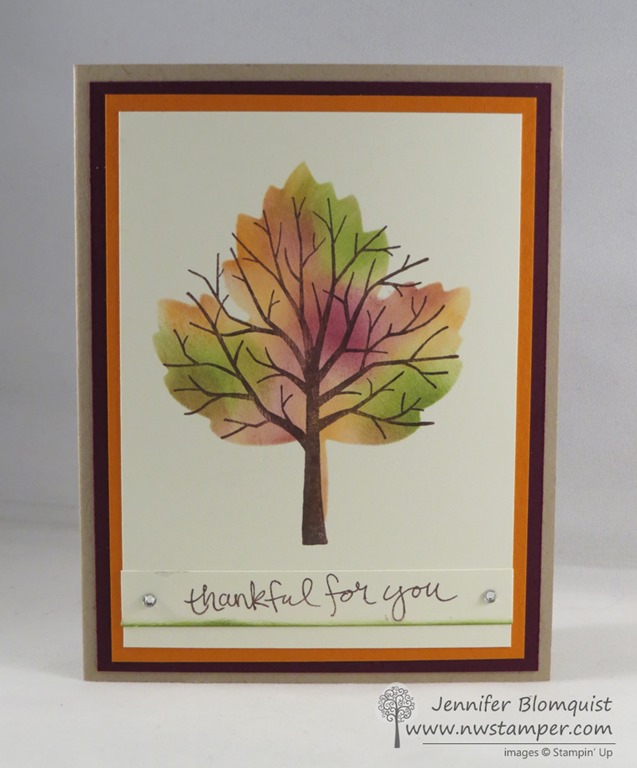
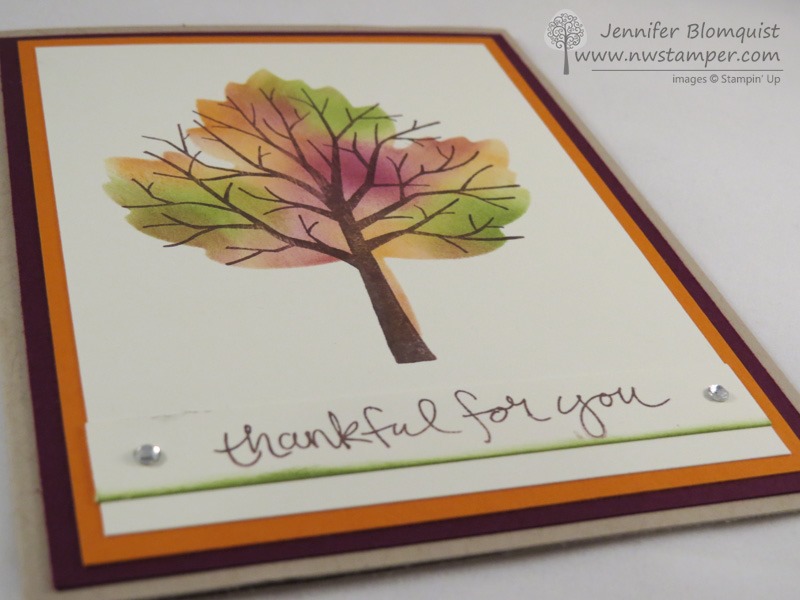
that overlaid the Leaflet framelits with the Sheltering Tree trunk. So I made my own version and used it as customer thank you cards. Isn’t it such a cool combination?
I never would have guessed that the two shapes were such a close
match, and with a little coloring, they are super pretty together! Jennifer’s Project Tips:
Start by creating a stencil with your favorite framelit! In this case, I used the maple leaf thinlit from the Leaflet framelits
and cut out a hole in a piece of computer/copy paper. You want your
paper to be thin… so not a piece of cardstock so that you can get right
up to the edge of the shape cleanly on all sides. You can throw away
the cut out shape, you really just want the hole!
Pick your favorite color combination – You are
going to place the stencil over your cardstock and then use sponge
daubers to color in the leaf. So grab your favorite 3-4 colors and
matching sponge daubers to do this. I used So Saffron, Pumpkin Pie, Old
Olive, and Blackberry Bliss.
When sponging, start with your lightest color!
Mainly this is to prevent your sponge dauber from picking up the darker
colors, plus it gives you a bit more control about how dark things
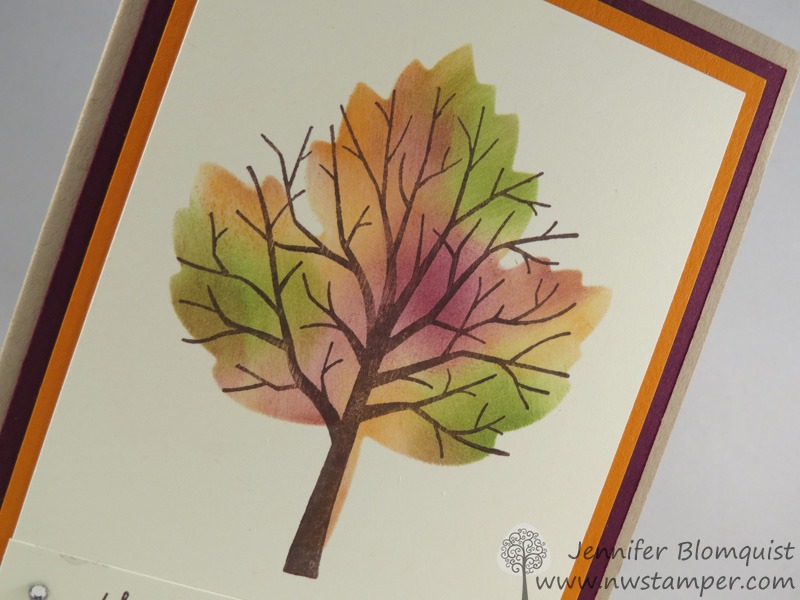
get. Here I sponged the ENTIRE leaf with the So Saffron, then I
started adding bits of the other colors hear and there to get the
tie-dye look.
Layer your stamped image on top of your sponged image
– by doing the sponged image first, you can see where your stamped
image needs to go, or if you want to adjust your stamped image to cover
up a less than perfect spot on your sponging. Thankfully, Sheltering Tree
is a photopolymer stamp (meaning it is totally clear) so I can see
exactly where to line up my stamp. But if you are using a rubber stamp,
you may want to use the Stamp-a-ma-jig to get things perfectly lined
up.
Add a little color to your sentiment – I wanted to
ground my image, so I took a strip of cardstock for my sentiment and
stamped it in the same brown so that it would be easy to read… but then I
sponged a little of the Old Olive along the bottom to make it feel like
grass and just “ground” my tree/leaf. A little color can go a long way
for really pulling a card together!
So, give this technique a try with any of your favorite framelits and
stamps. You may be surprised at how cool the combinations turn out! Jennifer's Blog
My card today is one I made for a Occasions Catalog swap and I gave you a sneak peek of it during my live stream last week. I used the Grateful Bunch Stamp Set with the Blossom Bunch Punch and the colors I used on the first card is Lost Lagoon and Calypso Coral.
The Designer Series Paper is Birthday Bouquet and I
love the colors ... so much so that I decided to make this card with
Mossy Meadow instead of Lost Lagoon. I had a hard time choosing which
is my favorite!
Measurements
Whisper White: 8-1/2 x 5-1/2, 3-1/4 x 4-1/4, 3 x 4-1/4 (for stamping), Lost Lagoon: 3-1/2 x 4-1/2,
DSP: 3 x 2-3/4
1.Score Whisper White card stock at 4-1/4 and fold to form card base.
2.Stamp images with Lost Lagoon ink, clean image and stamp with Calypso Coral ink.
3.Cut out flowers using the Blossom Bunch Punch.
4.Add small flower to larger flower with a Glue Dot, Add a Dimensional on the back of the Lost Lagoon flower and then add a Pearl in the middle.
5. Stamp greeting with Lost Lagoon ink and add Designer Series Paper.
6. Add Ribbon to the front of this layer and then add it to the Lost Lagoon layer with Snail Adhesive.
7. Place Dimensionals on the back and add to card front and add Flowers.
If you read yesterday's blog post here
on PattyStamps.com you saw my fun fold cards and video featuring the
beautiful Botanicals Suite of products, new in the 2016 Stampin' Up!
Occasions catalog!! I hope you enjoyed them!!
Today I'd like to share 2 more cards with the same fun fold
technique, but with different stamps, paper, colors, and embellishments.
I just love this card.. it might be a little busy and bright, but I
still think it's so pretty and it will be perfect for spring!! The top
flap of the card features my favorite pattern from the new Birthday
Bouquet paper pack (see more about that HERE).
The bottom flap of the card is just Whisper White cardstock that I
stamped with the Birthday Blooms stamp set and Watermelon Wonder ink.
You might remember I did that before: see my card here.
For the rose focal point, I stamped the large rose in the Birthday
Blooms set using Watermelon Wonder ink on Whisper Wite cardstock, and
then just blended in some color with my Blender Pen and Calypso Coral
ink! I cut it out with my Paper Snips, and for the leaf behind the
flower, I die cut part of the Rose Garden framelit with Mossy Meadow
cardstock! So pretty!! I wanted to pick up the Daffodil Delight color
on this card so I added a little stamen die cut from the Botanical
Builder framelits, and then a cute little yellow Enamel Dot in the
center, from the It's My Party suite, on pg 6 of the Occasions catalog.
The final touch was the greeting stamped in Watermelon Wonder from
the new set called "Enjoy the Little Things", found on page 33 in the
2016 Occasions catalog. DON'T MISS IT! Be sure to check out the other cards from this series and my VIDEO TUTORIAL HERE!
above and below: You'll see here how this fun fold card looks as you
open it. You can also see it in action in the video I linked above.
For my 2nd card today, I created this fun fold card with the new
products in the Have a Cuppa suite found on pages 34 and 35 in the 2016
Occasions catalog. The tea cups, kettle and cocoa mug are too cute in
this suite! Don't forget to BUNDLE AND SAVE 15%! the stamp set and Cups & Kettles framelits are available as a bundle at a discount! order #141074
There are 3 different cups/mugs in the framelit set, and I die cut
some Have a Cuppa paper with one of the tea cups, sponged around the
edge with Melon Mambo ink and a sponge dauber, then decorated it with
one of the embellishment pieces in the framelit set. I also die cut the
spoon, tea bag and hearts!
On the inside, I stamped 5 of the hearts in Melon Mambo from the "A Nice Cuppa" stamp set.
To make the pretty sparkly gold spoon, I just die cut the spoon with Whisper White cardstock and then colored it with the Gold Wink of Stella Pen! Don't miss those.. they are fun pens to add glimmer to all your projects (find them on pg 24).
As I explained in the video, you can either make 2 of these cards
from one 8-1/2" x 11" piece of cardstock, or, you can create 3 of them
from a 12" x 12" piece of cardstock. Please enjoy these instruction
sheets below with both cutting and scoring options for you!
Curious about the Wink of Stella Pen?? You can see more info in this Stampin' Up! Video! They are amazing!!
If you are having trouble viewing the video, click here to see it on Youtube, and click to order your GOLD Wink of Stella brush here, or your CLEAR Wink of Stella Brush here, today!
CLICK HERE to download your FREE Project Tip Sheet for the Fun Fold Cards!
https://www.youtube.com/watch?v=aGKBljCRNOg&feature=youtu.be Watch the VIDEO below, or click here to see it on YouTube. The cards below are created using the Botanicals suite of products,
NEW on pages 26 and 27 in the 2016 Stampin' UP! Occasions catalog. Did
you notice it's the centerfold!? eek.. such a beautiful 2 page spread!!
I've used the Botanical Gardens designer paper, the Botanical Blooms
stamp set, the Botanical Gardens Cardstock pack, the Botanical Builder
Framelits and the Botanical Gardens Washi Tape!
SAVE 15% when you buy the bundle: Stamp set, Paper and Framelits all in 1 bundle! CLICK HERE! As you begin to open this card, you can see right away how easy this card really is..
This 1/2 sheet of cardstock is just scored twice, then punched with a 2" circle punch!! How easy!
I stamped the images with the Grateful Bunch stamp set, found on pg 22 of the Occasions catalog.
Isn't that a fun card! I love this quick and easy card that just really packs a lot of WOW punch!!
Below is the card I made with Cindee when I stamped at her house in December. You can see her card here.
I love the Cajun Craze Scallop under the top flap.. that's from the
Cutie Pie thinlits... be sure not to overlook the extra pieces in the
great framelit sets!
We also used a fun new FREE Sale a Bration product on our cards.. did
you spot the pretty patterned Botanical Gardens Designer Vellum? It's
on pg 4 of the Sale a Bration catalog, and you can get that FREE when
you purchase the Botanical Suite Bundle I mentioned above!! Or, select
any of the other 10 free gifts in the Sale a Bration catalog with your
$50 purchase!
I die cut a flower in the 4x4 Whisper White piece of cardstock to
allow the Hello Honey cardstock to show through, then stamped one of the
Botanical Blooms flower images in the center! Such an easy touch that
lends a lot to the card! Feel free to print and save the instructions below for the Fun Fold
Card. I have 2 versions for you, mentioned in the video. You can
either make 2 cards from an 8-1/2" x 11" piece of cardstock, or make 3
cards from a 12" x 12" piece of cardstock.
As mentioned in the video above, here are the 2 variations with dimensions, cutting and scoring info. Above: create a Fun Fold card with an 8-1/2" x 11" piece of cardstock
Below: create 3 Fun Fold cards with a 12" x 12" piece of cardstock
If you read yesterday's blog post here
on PattyStamps.com you saw my fun fold cards and video featuring the
beautiful Botanicals Suite of products, new in the 2016 Stampin' Up!
Occasions catalog!! I hope you enjoyed them!! Today I'd like to share 2 more cards with the same fun fold
technique, but with different stamps, paper, colors, and embellishments.
I just love this card.. it might be a little busy and bright, but I
still think it's so pretty and it will be perfect for spring!! The top
flap of the card features my favorite pattern from the new Birthday
Bouquet paper pack (see more about that HERE).
The bottom flap of the card is just Whisper White cardstock that I
stamped with the Birthday Blooms stamp set and Watermelon Wonder ink.
You might remember I did that before: see my card here.
For the rose focal point, I stamped the large rose in the Birthday
Blooms set using Watermelon Wonder ink on Whisper Wite cardstock, and
then just blended in some color with my Blender Pen and Calypso Coral
ink! I cut it out with my Paper Snips, and for the leaf behind the
flower, I die cut part of the Rose Garden framelit with Mossy Meadow
cardstock! So pretty!! I wanted to pick up the Daffodil Delight color
on this card so I added a little stamen die cut from the Botanical
Builder framelits, and then a cute little yellow Enamel Dot in the
center, from the It's My Party suite, on pg 6 of the Occasions catalog.
The final touch was the greeting stamped in Watermelon Wonder from
the new set called "Enjoy the Little Things", found on page 33 in the
2016 Occasions catalog. DON'T MISS IT! Be sure to check out the other cards from this series and my VIDEO TUTORIAL HERE!
above and below: You'll see here how this fun fold card looks as you
open it. You can also see it in action in the video I linked above.
For my 2nd card today, I created this fun fold card with the new
products in the Have a Cuppa suite found on pages 34 and 35 in the 2016
Occasions catalog. The tea cups, kettle and cocoa mug are too cute in
this suite!
Don't forget to BUNDLE AND SAVE 15%! the stamp set and Cups & Kettles framelits are available as a bundle at a discount! order #141074
There are 3 different cups/mugs in the framelit set, and I die cut
some Have a Cuppa paper with one of the tea cups, sponged around the
edge with Melon Mambo ink and a sponge dauber, then decorated it with
one of the embellishment pieces in the framelit set. I also die cut the
spoon, tea bag and hearts!
On the inside, I stamped 5 of the hearts in Melon Mambo from the "A Nice Cuppa" stamp set. To make the pretty sparkly gold spoon, I just die cut the spoon with Whisper White cardstock and then colored it with the Gold Wink of Stella Pen! Don't miss those.. they are fun pens to add glimmer to all your projects (find them on pg 24).
As I explained in the video, you can either make 2 of these cards
from one 8-1/2" x 11" piece of cardstock, or, you can create 3 of them
from a 12" x 12" piece of cardstock. Please enjoy these instruction
sheets below with both cutting and scoring options for you!
Curious about the Wink of Stella Pen?? You can see more info in this Stampin' Up! Video! They are amazing!!