I'm so excited to have you join me today and make this adorable snowman box .
The snowman idea came from Linda Nicholls from the UK
Linda sent me an email with her version of the snowman she made and I fell in love with hers. I made my version right away. I of course asked her if she minded if I made a video on this adorable Curvy Keepsake Snowman box and she said yes but I think she was a little shocked I asked her if I could do a video on it . Thank you Linda .
In today's video I show the past Pumpkin & Scarecrow curvy keepsake boxes we have made and I mentioned I would post those video links in case you missed those .
Curvy Keepsake box collage Dawn Griffith Stampin'Up!
Scarecrow click HERE Pumpkin with witches & Santa's hat click HERE How to put the curvy keepsake box together & Bow Builder punch click HERE
You will need the Curvy Keepsake Thinlits # 135853 ~ I used Whisper White card stock # 100730
Here are all the punches you will need to make the snowman face and buttons. All products used are listed below for click reference.
2" Circle punch # 133782 Tree Builder Punch # 138295 Owl Builder punch # 118074 Word Window punch # 119857 Project Life corner punch # 135346
One of my favorite techniques this year has been water-coloring on
Crumb Cake card stock. I found it works best to emboss the image first
and then watercolor. I also did a quick watercolor wash over the die
cut word Snow after die cutting it twice and then layering it. Once it
was dry I just grabbed some color using my Aqua Painter and washed over
it. I love that layered look of the die cuts. Just adding one layer on top of each other makes them look much thicker.
Here are the items we will be using for the Puffy Paint .Items can be found at your local dollar store .
White Glue
Shaving Cream
Paint brush
spoon and paper bowl
For the Cardinal Bird we will be using the
Bird Builder punch #117191
Owl Builder punch#118074
All
the other items shown in today's video will be listed below . PLUS I
want to let you know I realize the Ornamental Pine stamp set is NO
longer available But I wanted to use the set for a few special cards I
am sending out to my special Demonstrator friends .I just wanted to
give you an idea on how to use the puffy paint on a card anyway . The other 2 sets used on today's card :
Hardwood stamp (w)# 133032 (c)# 133035
Six Sayings stamp set (w)# 139849 (c)# 139852 ( 2015 Holiday Catalog Hostess ONLY set )
- See more at:
http://www.dawnsstampingthoughts.net/2015/12/diy-puffy-paint-and-cardinal-with-bird-builder-punch-video-.html#sthash.Jt2hOafF.dpuf
Here are the items we will be using for the Puffy Paint .Items can be found at your local dollar store .
White Glue Shaving Cream Paint brush spoon and paper bowl
All the other items shown in today's video will be listed below . PLUS I want to let you know I realize the Ornamental Pine stamp set is NO longer available But I wanted to use the set for a few special cards I am sending out to my special Demonstrator friends .I just wanted to give you an idea on how to use the puffy paint on a card anyway .
The other 2 sets used on today's card :
Hardwood stamp (w)# 133032 (c)# 133035 Six Sayings stamp set (w)# 139849 (c)# 139852 ( 2015 Holiday Catalog Hostess ONLY set )
- See more at: http://www.dawnsstampingthoughts.net/2015/12/diy-puffy-paint-and-cardinal-with-bird-builder-punch-video-.html#sthash.Jt2hOafF.dpuf
A Gift Card Holder is the 11th project for the 12 Days of Christmas.
I used the Season of Cheer Designer Series with Cherry Cobbler Card Stockto make the Gift Card Holder .... along with the Antique Tags Hostess Stamp Set.
Here's the video on how to make the 12 Days of Christmas Day 11 .....Click HEREto watch the video on my Chic n Scratch website.
- See more at: http://mychicnscratch.com/2015/12/12-days-christmas-2015-day-11.html#comment-272639
A Gift Card Holder is the 11th project for the 12 Days of Christmas.
I used the Season of Cheer Designer Series with Cherry Cobbler Card Stockto make the Gift Card Holder .... along with the Antique Tags Hostess Stamp Set.
Here's the video on how to make the 12 Days of Christmas Day 11 .....Click HEREto watch the video on my Chic n Scratch website.
- See more at: http://mychicnscratch.com/2015/12/12-days-christmas-2015-day-11.html#comment-272639
A Gift Card Holder is the 11th project for the 12 Days of Christmas.
I used the Season of Cheer Designer Series with Cherry Cobbler Card Stock to make the Gift Card Holder .... along with the Antique Tags Hostess Stamp Set.
12daysofChristmas2015day11c
Here's the video on how to make the 12 Days of Christmas Day 11
1. Please read instructions all the way through before you begin. 2. Score 7-1/2” x 6” Designer Series Paper on the 7-1/2” side at 2-1/4” and 5-1/4”. Score on the 6” side at 1” and 5”. Fold and burnish score lines using the Bone Folder. Cut off the 2-1/4” x 1” sections on each corner of card stock (see diagram). 3. Fold bottom of gift-card holder up and trim off portion of both center tabs that show above (see diagram). Slightly trim tabs so gift-card holder will fold flat then adhere bottom of gift-card holder to side tabs using Fast Fuse Adhesive. Round corners of the top of gift-card holder using Project Life Corner Rounder. 4. Round the bottom corners of one piece of 3-7/8” x 3-1/8” DSP using corner rounder. Adhere to top front of gift-card holder using adhesive. 5. Adhere remaining 3-7/8” x 2-1/8” piece of DSP to inside front of gift-card holder using adhesive. Adhere 3-7/8” x 2-7/8” piece of DSP to the back of gift-card holder using adhesive. 6. Wrap 6-3/4” x 1-1/4” Cherry Cobbler card stock around gift-card holder, adhere ends together using adhesive creating belly band. 7. Punch scallop circle from 3” X 3” Cherry Cobbler card stock using 2-3/8” Scallop Circle Punch. 8. Stamp image onto 3” x 3” Whisper White card stock using Cherry Cobbler ink. Punch out using 2” Circle Punch. Adhere to scallop circle using Stampin’ Dimensionals. Adhere both to belly band using Stampin’ Dimensionals. 9. Add Rhinestones 10. Tie bow with baker’s twine and attach with a Glue Dot.
Stampin' Up! Supplies:
Stamps: Antique Tags 139855 (w) 140494 (c) Ink: Cherry Cobbler 126966 Paper: Cherry Cobbler 119685 7-1/2 x 6, 3 x 3, 6-3/4 x 1-1/4, Season of Cheer Designer Series Paper 139590 two pieces 3-7/8 x 2-1/8, 3-7/8 x 2-7/8, Whisper White 100730 3 x 3 Tools & Accessories: Simply Scored 122334, Bone Folder 102300, Project Life Corner Rounder 135346, 2” Circle Punch 133782, 2-3/8 Scallop Circle Punch 118874, Cherry Cobbler Bakers Twine 123125, Rhinestones 119246,Fast Fuse Adhesive 129026, Dimensionals 104430, Glue Dots 103683
Paper: Merry Moments Designer Series Paper - 138450
Silver Foil Sheets - 132178
Real Red 8-1/2" X 11" Cardstock - 102482
Tools and Accessories: Wonderful Wreath Framelits Dies - 135851
Simply Scored - 122334
Silver Cording Trim - 139620
Home For Christmas Designer Buttons - 139639
Big Shot - 113439
Magnetic Platform - 130658
Multipurpose Liquid Glue - 110755
Silicone Craft Sheet - 127853
Fast Fuse Adhesive - 129026
Glue Dots - 103683
Paper-Piercing Tool - 126189
Paper Snips - 103579
Paper:
Merry Moments DSP 138450 (12 x 3-1/2), Silver Foil
132178 (4 x 2-1/2 for framelit), Real Red (4 x 2-1/2 for framelit)
Tools & Accessories:
Paper Snips 103579, Wonderful Wreath
Framelits 135851, Simply Scored 122334, Home For Christmas
Buttons 139639, Silver Cording Trim 139620, Fast Fuse 129026,
Liquid Glue 110755, Silicone Craft Sheet 127853, Paper Piercer
126189, Glue Dots 103683, Big Shot 113439, Magnetic Platform
Instructions
1. Please read instructions all the way through before you begin.
2. Score the Merry Moments Designer Series Paper on the portrait
side at 1” on each side. Turn on landscape side and score @ 1”,
5-1/2, 6-1/2, 11”.
3. Fold on score lines, trim up to the score lines, add adhesive to tabs
and assemble box.
4. Cut Joy out of the Silver Foil and Real Red Card Stock.
5. Add Liquid Glue to the Real Red “Joy” and add to top of box.
6. Add Liquid Glue to the Silver “Joy” and place on top of the Real
Red.
7. Thread Silver Cording Trim through the button and tie a box and
add it to the box with a Glue Dot.
I really did have grand plans this year to get all of my Christmas
cards out early. After years of being terrible about NOT sending out
cards at all, last year I sent out around 70 holiday cards and it felt
great to be putting a little cheer out through the mail. So, I was all
gung ho that I was going to be all organized this year and get them in
the mail at the beginning of December. But then suddenly, I turned around and here it is December 16th and
they have yet to hit the post office! Anyone with me? How many times
do we have grand plans but one reason or another keeps us from making it
happen? Well, I’m here to say, it is never too late! In this case,
there is still time to make and send Christmas cards (or send the cards
you have!) Today’s share is a simple card idea that you can pull
together quickly for those people who need some holiday cheer from you.
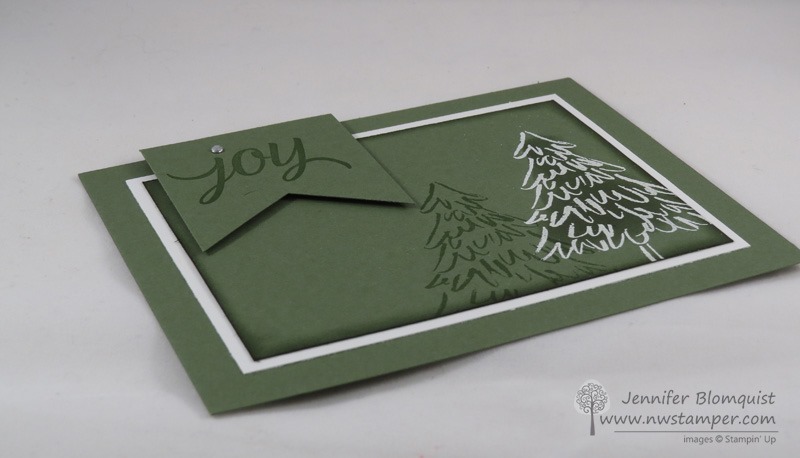
I actually made this card as a swap for the November OnStage Local
regional event. I decided the day that we were leaving that I wanted to
make swaps after all and so I pulled these together. They are clean
and simple, and easy to pull together! Tips for making this card:
Keep it simple and cost effective by choosing ONE color plus white
– I picked Always Artichoke because I had an almost full pack on my
desk and thought the muted color would be good for this design. Use
that color for your card base and for your smallest layer. Then just
use Whisper White cardstock as your matting layer to create a nice
border around your stamped images.
Use heat embossing for an easy-to-create WOW – I
kept in the deep green theme by stamping a tree and my sentiment in
Mossy Meadow ink, but added layers and dimension by stamping one tree in
Versamark ink and then covering it in White embossing powder. Heat set
for a snowy tree that really catches your eye.
Make your embossed images more interesting with sponging
– I sponged over my white embossed tree with Always Artichoke ink to
give the tree some depth. This is a great technique to use on any
project you are heat embossing though. Just match the ink color with
the color of the underlying cardstock for a rich addition to your
image. You can also make your central cardstock have more dimension
with the same trick only by sponging the edges of the cardstock with the
same color ink.
Try out different size banners! – I had left over
Always Artichoke cardstock strips after cutting for the smaller piece on
this card. So I decided to use them by cutting them in half and
stamping my sentiment (the Joy from the Your Presents stamp set). I
normally do longer and skinnier banners, but this smaller size was just
right for this card.
Make banners more easily with the Banner Triple Punch
– The best part about adding banners is that I don’t have to try hard
to make the ends look even and nice thanks to the Banner Triple Punch (I
still want to call it the triple banner punch!) Even if your piece is
small, you can slide it in to this punch and with a press, you have
perfect banner ends! Easy Peasy!
So, if you still have Christmas cards to make, you still have time!
I tried lots of different designs and combos for these cards and I
really liked layering the Red Foil Delicate ornament over the Gold Foil
solid shape ornament! So pretty! Then layering it onto the silver foil
snowflake vellum sheet was just stunning!!
You'll find both the silver snowflake vellum and the red striped
vellum in the Holidays Fancy Foil Designer Vellum pack on pg 32 of the
holiday catalog.
Above: you can see the layers I die cut with the Delicate Ornaments dies... aren't they pretty in the Gold and Red Foil!?
No matter if you pair these ornaments up with gold or silver embellishments, they look fantastic either way!
The Winter Wonderland Rhinestone Snowflake embellishments are so
gorgeous and sparkly and are a great addition to these Christmas Holiday
cards as well!
That's one thing we have had very little of this winter (so far) - is
snow. Not that I'm complaining! I prefer this to shoveling and
slipping and sliding.
The challenge with Try Stampin on Tuesday is
a sketch challenge - snowflakes can be added if we wished to. Guess
what, I wished to. I decided to make a snowflake shaker card.
This is a 5 by 5 Pacific Point base card which has had a shaker element built into the front of it.
I used Fun Foam to make the shaker, die cutting the circle using the
Circle Framelits. The Whisper White front layer was die cut at the
same time. I also die cut a piece of Christmas DSP that had snowflakes
in the pattern- to place behind the shaker.
A window sheet, die cut with the circle framelits was attached to
the wrong side of the whisper white layer using the Fine Tip glue pen.
The die cut fun foam was adhered to the DSP which was attached to a
piece of Whisper White cardstock slightly smaller than the card size.
Frosted Sequins were used as the shaker elements.
On the right side I used the embossed resistance technique using
Plenty of Wishes embossed with white embossing powder and then the panel
sponged with Pacific Point ink. A paper towel was used to make the
snowflakes "pop". A circle framelit was used to cut the circle around
the shaker, and it was then adhered to the front of the card. A piece
of silver ribbon was adhered to the edge of this panel.
The rest of the Whisper White card front was stamped randomly with the snowflake stamp from Happy Scenes in Pacific Point ink.
Before adding the snowflake embellishments, I die cut a circle of
dazzling diamond glimmer paper (use 2 sizes of circles and die cut at
the same time) and adhered it around the periphery of the shaker circle.
The embellishment consists of a small snowflake punched in Pacific
Point using the Snow Flurry punch. On top of that, and adhered with a
glue dot is a snowflake punched in dazzling diamond glimmer paper, using
a non SU punch. In the center is a silver sequin.
Only the first part of the sentiment is on the front of the card. The rest is on the inside.
Supplies Used: Stamps: Flurry of Wishes, Happy Scenes, Sentiment (unknown) Inks: Versa Mark, Pacific Point, Black Memento Papers: Pacific Point, Whisper White, Fun Foam, Dazzling Diamond Glimmer paper, Window sheet Accessories: Circles Framelits, Frosted Sequins, Snow Flurry Punch, snowflake punch (unknown), glue dots, silver sequin, silver ribbon.
I’ve got a quick treat for you today that is easy and FUN! It also gives another use for the MINI TREAT BAG THINLIT. I told you these were fun! This is a great way to give a small gift to teachers, mail carriers, etc. I used the smaller die from the treat bag and cut out two to adhere
together to create the pocket for the candy cane. To make it a little
fancier, I cut a 2″ x 6″ piece of Whisper White and punched a tag at the
top with the Scalloped Tag Topper Punch. This long tag is a great place to write “to and from” for your gift.
It also secures the candy cane in the pocket. I used a couple of glue
dots to adhere the candy cane to the tag and added gold ribbon to the
top. If you are looking for a treat idea, this is the way to go! There
are so many ways to embellish and lots of great designer paper patterns
to choose from! Nicole's Blog
This past Saturday we had our Luv2Stamp Christmas Party at Fuddrucker's.
It was so much fun. We all brought a hand made gift in a bag,
unwrapped. Then we went around and picked a bag. Now we could steal from
each other, but no one did. It seemed that the bag that we each picked
was perfect for ourselves.
My gift was this Snowflake Hanger.
I took 3 different snowflakes and hot glued them together. Then I took
some of our Gold Cording and wrapped around two of the snowflakes and
hot glued it. I just couldn't think of any other way to glue them
together so they would be sturdier.
I embossed in Gold on all three of them. Some more than others. For the
first one I stamped the Snowflake from Flurry of Wishes in Versamark
then sprinkled Gold Embossing powder over it and embossed. I added one
of our Snowflake Elements and a Linen Thread bow. You can see I attached
some Gold Sequins to the bottom of the Embossed Snowflake. Punched this
snowflake with matching punch.
This one I embossed and fussy cut the snowflake and made it into a
shaker. Added another Snowflake Element with a Linen Thread bow.
Last one, I added a Corrugated Star (used Stars Framelits)that was
embossed with Gold Embossing Powder with more Sequins, Gold Ribbon and
the Tree die cut piece, which is from the Square Pillow Box (its on the
retirement list.....insert sad face).
Darlene picked my gift. Hope she likes it! I love these snowflakes. I only have a few more.......
This is how they come at Michael's. You get 2 each of 4 designs. I got
them on sale for under $3, they are regularly $6.99. I bought 3
packages. You can see a couple of the ornaments I made HERE! My Stamp Club gals loved making these ornaments.
Need a quick Holiday gift idea?
Enjoy this quick Holiday Gift Idea for a hot chocolatey treat for your
co-workers, neighbors, friends, and it makes a great teacher gift, too!
I used a Stampin' UP! Tag a Bag Kraft bag folded in 1/2 and decorated
with stamped images to dress up this Hot Chocolate treat pouch! WATCH THE VIDEO HERE to see how to make this cute pouch that also doubles as a gift card holder pouch!
These are the 2 stamp sets and cute little bags I used for this project:
Snow Place stamp set - save 15% on the Bundle which includes the framelit dies!
Kraft Tag a Bag gift bags
Cup of Cheer stamp set (wood or clear mount)
See the ordering info at the bottom of this post for more info on these products
After folding the Kraft bag, I wrapped a 10-1/2" x 2" piece of
striped Color Me Irresistible paper around the bag. I love the already
embossed striped on it.. so pretty! Then I punched a piece of the
polkadot pattern Color Me Irresistible paper (brayered with Real Red)
using my 2-3/8" scalloped circle punch, and a 2" circle of striped paper
from the Season of Cheer paper pack and added those on the left side. I
stamped and die cut the snowman and his scarf and hat using the Snow
Friends / Snow Place bundle. The cut mug was stamped with the Cup of
Cheer set in Real Red on Thick Whisper White and cut out with my Paper
Snips. Add 3 randomly placed rhinestones and you are done!
Slip in a hot cocoa packet, chocolate dipped spoon, candy cane, gift card, love note, photo... :)
Check out these other cute projects with the Cup of Cheer set by Stampin UP!
Hi Stampers, Today we will be making my swap I did for my team organized swap . I used Mossy Meadow card stock #133676
cut at 4 1/4" x 11" / scored at 5 1/2"
Crumb Cake card stock#1210953
cut at 4" x 5 1/4"
Corrugated paper #138317 Very Vanilla card stock # 101650 We will also be using the Peaceful Pines stamp set #139728 Perfect Pines Framelits # 139665
Bundle and save 15% 140850
Christmas Greetings Thinlits # 139659
- See more at:
http://www.dawnsstampingthoughts.net/2015/12/peaceful-pines-christmas-card-team-swap-video.html?utm_source=feedburner&utm_medium=email&utm_campaign=Feed%3A+typepad%2FcauJ+%28Dawns+Stamping+Thoughts%29#sthash.k4iVqaO1.dpuf
.Peaceful Pines swap card Dawn Griffith Stampin'Up! Today we will be making my swap I did for my team organized swap .
I used Mossy Meadow card stock #133676 cut at 4 1/4" x 11" / scored at 5 1/2"
Crumb Cake card stock#1210953 cut at 4" x 5 1/4"
Corrugated paper #138317
Very Vanilla card stock # 101650
We will also be using the
Peaceful Pines stamp set #139728
Perfect Pines Framelits # 139665 (Bundle and save 15% 140850)
Christmas Greetings Thinlits # 139659
- See more at: http://www.dawnsstampingthoughts.net/2015/12/peaceful-pines-christmas-card-team-swap-video.html?utm_source=feedburner&utm_medium=email&utm_campaign=Feed%3A+typepad%2FcauJ+%28Dawns+Stamping+Thoughts%29#sthash.k4iVqaO1.dpuf
Glitter Window Technique: Happy Scenes, Hearth & Home Bundle
I received a swap card earlier this fall that brought back memories of the Glitter Window Technique.
I taught the technique to my club members many years ago, but I
thought it was time to do it again. I cased Brenda Sprenger's swap card
that used the Hearth & Home Thinlit Diesfrom
the Holiday Catalog. Below you'll find my version, as well as a How'd
She DO That? video. Get out some packing tape and Dazzling Diamonds
Glitter, and let's get started! WATCH VIDEO: Hearth & Home Glitter Window
The snowflakes were created using the Flurry of Wishes bundle and heat embossed on Vellum cardstock.
These photos don't do justice to this card (very hard to photograph).
You'll just have to try it to see how beautiful it is in real life.
Have fun creating your own Glitter Window Technique cards!
A Christmas Bag is the 5th project for the 12 Days of Christmas. I used the Season of Cheer Designer Series Paper with the Oh What Fun Stamp Set. To close the bag I used a Clothespin that I covered with the Silver Foil ... and I added a small strip of the Silver Sequin. Here's the video on how to make the 12 Days of Christmas Day 5 .....CLICK HERE to watch the video on my Chic n Scratch website. Click here to download the Instructions Stampin' Up! Supplies:
- See more at: http://mychicnscratch.com/2015/12/12-days-of-christmas-2015-day-5.html#sthash.64JhnElE.dpuf
12 Days of Christmas 2015 Day 5
December 9, 2015
A Christmas Bag is the 5th project for the 12 Days of Christmas. I used the Season of Cheer Designer Series Paper with the Oh What Fun Stamp Set. To close the bag I used a Clothespin that I covered with the Silver Foil ... and I added a small strip of the Silver Sequin. Here's the video on how to make the 12 Days of Christmas Day 5 .....CLICK HERE to watch the video on my Chic n Scratch website. Click here to download the Instructions Stampin' Up! Supplies:
- See more at: http://mychicnscratch.com/2015/12/12-days-of-christmas-2015-day-5.html#sthash.64JhnElE.dpuf
12 Days of Christmas 2015 Day 5
December 9, 2015
A Christmas Bag is the 5th project for the 12 Days of Christmas. I used the Season of Cheer Designer Series Paper with the Oh What Fun Stamp Set. To close the bag I used a Clothespin that I covered with the Silver Foil ... and I added a small strip of the Silver Sequin. Here's the video on how to make the 12 Days of Christmas Day 5 .....CLICK HERE to watch the video on my Chic n Scratch website. Click here to download the Instructions Stampin' Up! Supplies:
Stamps: Oh What Fun 140386 Ink: Night of Navy 126970 Paper: Season of Cheer DSP 139590 (10 x 5), Thick Whisper White 140272 (2” Circle), Silver Foil 132178 (2-3/8 Scallop Circle and small strip for Clothespin Tools & Accessories: Simply Scored 122334, 2” Circle Punch 133782, 2-3/8 Scallop Circle Punch 118874, Silver Sequin 13839, Silver Cording Trim 139620, Rhinestones 119246, Paper Piercer 126189, Clothespins 133764, Glue Dots 103683, Dimensionals 104430, Bone Folder 102300 Instructions 1. Please read instructions all the way through before you begin. 2. Stamp the image with Night of Navy ink and cut out with the 2” Circle Punch. 3. Cut out a Foil 2-3/8 Scallop Circle and add the image to it with a Dimensional. 4. Cut three Rhinestones in a row and attach below image. 5. Now we’ll make the box .... Score the DSP @ 1-1/4 on both sides of the portrait side. Score @ 4” on both sides of the landscape side. 6. Fold on score lines and then turn on the portrait side and fold the center score line down to the score line on the line side. Repeat on all four corners. Bring top together and hold with a binder clip. 7. Cut small piece of Silver Foil, attach to Clothespin with Glue Dots and trim around it. Repeat on other side. 8. Tie a bow with the Silver Cording Trim and add to Clothespin with a Glue Dot. 9. Remove binder clip and add to top of bag with a small strip of Sequin Trim.
Stampin' Up! Supplies:
Oh, What Fun Photopolymer Stamp Set - 140386
Season Of Cheer Designer Series Paper - 139590
Silver Cording Trim - 139620
Silver Sequin Trim - 138399
Clothespins - 133764
2" Circle Punch - 133782
2-3/8" Scallop Circle Punch - 118874
Silver Foil Sheets - 132178
Night Of Navy Classic Stampin' Pad - 126970
Rhinestone Basic Jewels - 119246
Simply Scored - 122334
Whisper White 8-1/2" X 11" Thick Cardstock - 140272
Glue Dots - 103683
Paper-Piercing Tool - 12618
- See more at: http://mychicnscratch.com/2015/12/12-days-of-christmas-2015-day-5.html#sthash.64JhnElE.dpuf