Tuesday, June 30, 2015

Make A Stamp From Fun-Foam - by Nichole Tugrul


How about a FUN stamping trick!

I’m slowly but surely making my way through new stamp sets, it’s hard to put down favorites sometimes!  A WHOLE LOT OF LOVELY is a hostess set that caught my eye with it’s beautiful bold sentiments.
Butterfly stamp
Combine this lovely sentiment with beautiful designer paper and you have one gorgeous card!  Wonder where the inspiration for this design came from??  Well, look no further than the fabulous sketch challenge from Create with Connie and Mary.
CCMC361
Sometimes I need a little nudge when using a new set, sketch challenges are the perfect solution!
Whole lot of Lovely up close
The sentiment in Pear Pizzaz ink and cardstock stands out beautifully from the English Garden Designer Paper.  These colors are so beautiful and soft, I just love this combination!  Now look at the background, it has something unique….can you spot it??
Make your own stamps!
Did you notice the butterflies??  If not, you’ll notice them now!  A member of the Luv2Stamp group mentioned this idea on our Facebook group and I had to give it a try!  ( I couldn’t find who it was…please comment if it’s you so I can give you credit!)
Die cut your own stamps!
It’s super easy, just cut a piece of fun foam with adhesive on the back for the size thinlet you are using.  I put 1 dryer sheet under the foam to help pull out all the small pieces from the butterfly.  Run it through and you’ve just made a stamp!  I put two layers of butterfly on a block, each cut individually to avoid flattening the fun foam too much.   Now you’re ready to stamp!
Make your own stamps, it's easy! www.becreativewithnicole.com
I had so much fun with this new stamping trick!! I hope you’ll give it a try and let me know how it goes!!
Whole lot of Lovely


http://www.becreativewithnicole.com/how-about-a-fun-stamping-trick/

Friday, June 26, 2015

Painted Resist, by Pat Huntoon


More Painted Resist...with a Stencil!


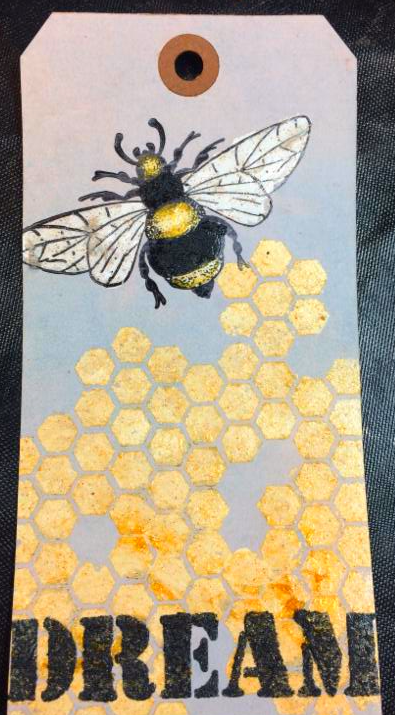
Another popular project from our booth, both the painted stencil area and the bee resist the spray. 
 

This tutorial uses Vega Gold Sorbet, Dazzling Clear Coat and Several Coloration Sprays, along with the Beehive and Soliloquy Stencils . The stenciling  of the word "Dream" was done with Lava Stone Effects. 


To start, placethe Beehive stencil over the tag at an angle. Using Vegas Gold Sorbet paint, use a stipple brush to push the paint through the stencil using an up-and-down motion. This will push the paint through the stencil and still pull the paint up. Since Sorbet is actually a Dimensional Gel Medium, the resulting piece will be very textural. Allow the paint to dry.


Using StazOn Ink, stamp the Big Bee Stamp above thedried beehive.

Paint the wings with Dazzle Clear Coat - which will dry clear with some glittery effects -- and the uncolored part of the body with more Vegas Gold Sorbet. The Black areas were painted with Lava Stone effects -- making it feel almost furry.

Once the paint is dry, spray the entire piece with several Coloration sprays. Let the spray soak in a bit, then use a paper towel to soak up the remaining color. Allow the colors to dry, using a heat tool to speed drying if desired.
Once the tag is dried, a word can be stenciled. We use the Soliloquy Stencil with the Lava Stone effects, because the Stone effects leave a tremendous texture on the finished piece. Simply Stipple the paint in a straight up-and-down motion through the stencil while holding it firmly. Lift the stencil straight up when done, then allow the paint to dry. Enjoy!


S402 Bee Quotes
$14.95
 
SD333 Big Bee
$5.95


Wednesday, June 17, 2015

Travel Card by Lisa Rhine


I saw this card in my mind's eye, so I had to make it!  It was made with a mix of products new, old and other...I'll explain.  

Using the Layered Letters Alphabet Stamp Set (new), Typeset Specialty Designer Series Paper (a timeless classic), Triangle Punch (retired), and the Sizzix Globe Thinlits Die (other), I created this Go See Do Travel Card.


I love the new Layered Letters Alphabet Stamp Set!  It's photopolymer, so you can see exactly where you are stamping.  And it's large, so you can make big statements.

Layered Letters Alphabet 
For this card, I aligned all of my letters* onto Block E and stamped my sentiment in Memento Tuxedo Black ink onto White Vellum Cardstock.  I didn't want the ink to smear, so I heat set it using Black Stampin' Emboss Powder and my Heat Tool.
*There's only one of each letter in the set, so for the second "E" in "SEE," I put the "E" onto Block B and completed the word that way.


I attached the vellum piece onto the card by using four Mini Glue Dots.  I hid them behind the two letters at the top of the card and the two at the bottom.  You can't see them at all!


Lisa's Blog...
http://www.getcraftywithlisa.com/2015/06/go-see-do-travel-card.htmltp://www.getcraftywithlisa.com/2015/06/go-see-do-travel-card.html
 

Making A Gift Bag Using the Gift Bag Punch Board


I used the new Farmer’s Market designer paper… I like how you can go a bit more rustic/country style on some sides and more elegant or at least all-occasion on the other sides.

image

And what bag would be complete without a cute gift tag?  I grabbed my You’re So Sweet stamp set (yes, made for the Mini Treat Bag dies but who says you can’t use it with other things too?  Here I layered the “Just For You” sentiment for the central point of my card.
 
TIP:  Use the Mini Treat Bag thinlit dies to cut out the center banner piece (they are made to go together!) then layer on a stamped version in a different color that you cut out by hand.
I also found that the smallest of pearls are a perfect match for the dots in the center of the flourishes above the sentiment.
Finally, when you get the stamp set, they helpfully pre-die cut the rubber for your stamps including the INSIDES of the Heart and the Star stamp images from this set.
image
Use the center of the star stamp to create the star over the sentiment… I used Delightful Dijon, but just be sure to stamp off onto scrap paper TWICE before stamping on your image!

Walkthrough Wednesday Video

Check out this video to see how to make this bag from start to finish


 https://www.youtube.com/watch?v=hXetAnTTa5o&feature=youtu.be

Jennifer's Blog... 
http://www.nwstamper.com/how-to-make-your-own-gift-bags-with-the-gift-bag-punch-board-video-tutorial-walkthrough-wednesday/?utm_source=feedburner&utm_medium=email&utm_campaign=Feed%3A+NwStamper+%28Northwest+Stamper+-+a+Stampin%27+Up!+Blog%29


Pop Out Swing Card - by Dawn Griffith


Pop Out Swing Card

Wondrous JOY
Video:


Here are the Cherry Cobbler card stock  measurements 

    5 1/2" x 8 1/2" scored at 4 1/4
    4 1/2" x 6" scored at 2" - 4"


Supplies:

• Cherry Cobbler Card Stock # 119685
• Whisper White card stock # 100730
• Red Glimmer paper # 121790
• Stampin' Dimensionals # 104430
• 1/8" Handheld Circle punch # 134365
• 1/2" Circle punch # 119869
• 1 1/4" Circle punch # 119861
• 1 3/8" Circle punch # 119860
• 1 3/4" Scallop Circle punch # 119854
• Big Shot Die Cutting Machine # 113439
• Square Framelits # 130921
• Wondrous Wreath stamp set # 135047
• Wonderful Wreath Framelits # 135851
• Wondrous Wreath Bundle save 15% # 137624
• PL Holiday Cheer stamp set #135188
• Silver Foil Sheets # 132178
• Versa Mark ink pad #102283
• Silver Embossing powder#109131
• Heat Tool # 129053


http://dawnsstampingthoughts.typepad.com/dawns_stampin_studio/2014/12/pop.html


Here are the Cherry Cobbler card stock  measurements  
  • 5 1/2" x 8 1/2" scored at 4 1/4
  • 4 1/2" x 6" scored at 2" - 4"
- See more at: http://dawnsstampingthoughts.typepad.com/dawns_stampin_studio/2014/12/pop.html#sthash.o82me9Em.dpuf
Here are the Cherry Cobbler card stock  measurements  
  • 5 1/2" x 8 1/2" scored at 4 1/4
  • 4 1/2" x 6" scored at 2" - 4"
- See more at: http://dawnsstampingthoughts.typepad.com/dawns_stampin_studio/2014/12/pop.html#sthash.o82me9Em.dpuf
Here are the Cherry Cobbler card stock  measurements  
  • 5 1/2" x 8 1/2" scored at 4 1/4
  • 4 1/2" x 6" scored at 2" - 4"
- See more at: http://dawnsstampingthoughts.typepad.com/dawns_stampin_studio/2014/12/pop.html#sthash.o82me9Em.dpuf
Here are the Cherry Cobbler card stock  measurements  
  • 5 1/2" x 8 1/2" scored at 4 1/4
  • 4 1/2" x 6" scored at 2" - 4"
- See more at: http://dawnsstampingthoughts.typepad.com/dawns_stampin_studio/2014/12/pop.html#sthash.o82me9Em.dpuf
Here are the Cherry Cobbler card stock  measurements  
  • 5 1/2" x 8 1/2" scored at 4 1/4
  • 4 1/2" x 6" scored at 2" - 4"
- See more at: http://dawnsstampingthoughts.typepad.com/dawns_stampin_studio/2014/12/pop.html#sthash.o82me9Em.dpuf
Here are the Cherry Cobbler card stock  measurements  
  • 5 1/2" x 8 1/2" scored at 4 1/4
  • 4 1/2" x 6" scored at 2" - 4"
- See more at: http://dawnsstampingthoughts.typepad.com/dawns_stampin_studio/2014/12/pop.html#sthash.o82me9Em.dpuf
Here are the Cherry Cobbler card stock  measurements  
  • 5 1/2" x 8 1/2" scored at 4 1/4
  • 4 1/2" x 6" scored at 2" - 4"
- See more at: http://dawnsstampingthoughts.typepad.com/dawns_stampin_studio/2014/12/pop.html#sthash.o82me9Em.dpuf
Here are the Cherry Cobbler card stock  measurements  
  • 5 1/2" x 8 1/2" scored at 4 1/4
  • 4 1/2" x 6" scored at 2" - 4"
- See more at: http://dawnsstampingthoughts.typepad.com/dawns_stampin_studio/2014/12/pop.html#sthash.o82me9Em.dpuf
Here are the Cherry Cobbler card stock  measurements  
  • 5 1/2" x 8 1/2" scored at 4 1/4
  • 4 1/2" x 6" scored at 2" - 4"
- See more at: http://dawnsstampingthoughts.typepad.com/dawns_stampin_studio/2014/12/pop.html#sthash.o82me9Em.dpuf

Monday, June 15, 2015

Aqua Painting Peacock Image by Dawn Olchefske


Perfect Peacock Anniversary card by Dawn Olchefske  #dostamping #stampinup
If ever there was an image begging to be colored, it's this majestic peacock on a branch. The Perfect Peacock stamp is not a typical image I would purchase.   As much as it begs to be colored, it's really too much coloring for me.  However, a dear friend of my collects peacocks and I just had to get it! 
Perfect Peacock Anniversary card by Dawn Olchefske  #dostamping #stampinup
This past weekend she and her husband celebrated their 50th wedding anniversary. So I finally put stamp to paper and did a little experimenting with coloring.  As coloring is not my forte, it did take a couple tries.  Initially, I embossed the peacock in gold (for their 50th) and started coloring.  But the color wasn't popping the way I had hoped it would.  So "take two" seemed to work and here's what I did:
  • Start with a 3-7/8" x 5-1/8" piece of Shimmery White cardstock (it's my preferred paper to use when I'm coloring with water...notice I didn't say watercolor.  I'm so not a watercolorer!)
  • Stamp Perfect Peacock with Versamark ink and heat emboss with Clear Embossing Powder.
  • Color using Aqua Painters (I prefer mine a bit more on the dry side, so I have more control)
    • Color wash peacock with Tempting Turquoise ink, let dry
    • Add details to feathers/body with Island Indigo and Elegant Eggplant inks
    • Color wash flower with Wisteria Wonder ink, let dry
    • Add details to flowers with Elegant Eggplant
    • Color wash leaves with Pear Pizzazz ink, let dry
    • Add details to leaves with Old Olive ink
    • I did add another layer of Island Indigo ink to the feathers, as I wanted the color to be a little more intense
Perfect Peacock Anniversary card by Dawn Olchefske  #dostamping #stampinup

http://dostamping.typepad.com/dostamping_with_dawn/2015/06/perfect-peacock-anniversary.html?utm_source=feedblitz&utm_medium=FeedBlitzRss&utm_campaign=dostampingwithdawn

June 15, 2015


From Land To Sea card by Sandi MacIver


Watercolor Stamping And Bokeh Technique


Stampin Up From Land to Sea Stamp Set, card by Sandi @ www.stampingwithsandi.com

  • I started by Heat Embossing the images twice in white onto watercolor paper
  • then I added a background wash starting at the bottom:
  • Elegant Eggplant, Lost Lagoon and Mint Macaron.

From Land to Sea card by Sandi @ www.stampingwithsandi.com


How to add a wash:
  • Squeeze your aqua painter in the center of the water color paper and let 2 or 3 drops fall.
  • Use the brush tip to wet the entire piece of paper
  • Use the ink pad lids and the brush tip to add the color letting them run together.
TIP – as it starts to dry, it will lighten, you can re-wet the section and add more color

building a circle stencil 

  • While I waited for the piece to dry, I used a Stampin Up Window Sheet and my Circle Framelits to create my own stencil.
  • You want to use different sized circles to create this stencil.
TIP – and you want to clean it when you are finished, unlike mine in this photo, haha….


Frm Land to Sea - adding the Bokeh Technique  Sandi @ www.stampingwithsandi.com
Next – I added the Bokeh Technique – originally a photography technique, and we carders have “borrowed” it, haha….
  • place the stencil over the art piece
  • add White Craft Ink with a Sponge Dauber in a circular motion.
TIP – make sure your art piece is dry before you start this or it will pick up the watercolor ink.

Stampin Up From Land to Sea and the Bokeh technique - Sandi @ www.stampingwithsandi.com 

gives you this cool effect at the end.  I love how it looks like sunlight dancing off the water.

Stampin Up From Land to Sea card by Sandi @ www.stampingwithsandi.com
Then of course you want to mat it and frame it…..

 
I like to keep my matting and framing really simple when I have a super busy art piece and I always pick colors I used in my piece
If you would like access to 4 videos and 4 more tutorials on this technique – we have an entire class loaded in the video library over at Stamping and Blogging – come on over and join the fun!.

http://stampingwithsandi.com/new-stamp-set-from-land-to-sea/

http://stampingwithsandi.com/welcome-to-stamping-blogging/


Saturday, June 13, 2015

HSDT Fun Fold #5: Watercolor Wings Tunnel Card by Dawn Olchefske


Watercolor Wings Tunnel Card

Here's the next video in my Fun Fold Card Series and it features the Tunnel Card Fun Fold. It was one of three projects we did at my Stamping Club Class last month.  We used Occasions Catalog products (Birthday Balloon stamp set).  However, for today's video, I reached for some new product...Watercolor Wings Bundle and Fluttering Texture Impressions Folder.

Watercolor Wings Tunnel card Fun Fold HSDT video series by Dawn Olchefske #dostamping #stampinup

I kept the front of the card pretty clean and simple.  But boy, it packs a wow!  The new Fluttering Textured Impressions Embossing Folder is awesome and a must-have!  I didn't want the texture over the entire card, so I had to do a little fadoodling to figure out to do it (tips shown in the video).  Love the results!

Watercolor Wings Tunnel card Fun Fold HSDT video series by Dawn Olchefske #dostamping #stampinup

Here's a closer look at the smaller butterfly from the Watercolor Wings Photopolymer Bundle
  • Stamp outline image with Elegant Eggplant
  • Stamp inside details with Wisteria Wonder
  • Die cut with Butterflies Framelit
  • Add the new Silver MetallicThread (tips shown in video)
  • Adhere to card with Stampin' Dimensionals.
Watercolor Wings Tunnel card Fun Fold HSDT video series by Dawn Olchefske #dostamping #stampinup

As pretty as the front of the card is, the even bigger wow is when you open it up to reveal the "tunnel" on the inside of the card.  
Here's some Tunnel Card details:
  • Only uses two 8-1/2" x 5-1/2" sheets of card stock.
  • The "window" piece is scored at 2-1/8, 4-1/4" & 6-3/8"
  • Die cut a window in the center of the window piece (I used Oval Collection Framelits)
  • The "base" piece is stamped before folded in half (tips shown in the video)
  • Only adhere the left panel and the right panel of the window piece to the base piece.
  • Decorate the front of the card as you like
  • See a demonstration in the video below (watch until the end for three more samples)
WATCH VIDEO: Watercolor Wings Tunnel Fun Fold Card


Another way to only emboss where you want is to let the top plate cover only the part you want embossed ie: not covering the whole embossing folder.  (Thanks goes to Louise Rolf!)

 
Supplies...

– Stamp
• Watercolor Wings Photopolymer Bundle [140232] —— http://bit.ly/1QuJjcR
• Butterflies Thinlits Dies [137360] —— http://bit.ly/1QuJlkI
• Silver Metallic Thread [138402] —— http://bit.ly/1QuJlkK

– Ink
• Wisteria Wonder Classic Stampin' Pad [126985] —— http://bit.ly/1QuJl4n
• Elegant Eggplant Classic Stampin' Pad [126969] —— http://bit.ly/1QuJl4r

– Card Stock
• Whisper White 8-1/2" X 11" Card Stock [100730] —— http://bit.ly/1Fjzsf7

– Tools & Adhesive
• Big Shot Magnetic Platform [130658] —— http://bit.ly/1QuJjcT
• SNAIL Permanent Adhesive [104332] —— http://bit.ly/1QuJlkN

– Ribbon & Trim
• Wisteria Wonder 1/2" Seam Binding Ribbon [134572] —— http://bit.ly/1QuJjtb

– Accessory
• Rhinestone Basic Jewels Embellishments [119246] —— http://bit.ly/1FjzqnM
• Stampin' Dimensionals [104430] —— http://bit.ly/1Fjzsfg

– Big Shot
• Big Shot [113439] —— http://bit.ly/1QuJl4u
• Ovals Collection Framelits Die [129381] —— http://bit.ly/1QuJjt7
• Fluttering Textured Impressions Embossing Folder [139304] —— http://bit.ly/1QuJjt9


Dawn's Blog -->  http://dostamping.typepad.com/dostamping_with_dawn/2015/06/hsdt-fun-fold-5-watercolor-wings-tunnel-card.html?utm_source=feedblitz&utm_medium=FeedBlitzRss&utm_campaign=dostampingwithdawn


https://www.youtube.com/watch?t=1000&v=frSq8-i327s